

How To Draw A Buffalo Head
How to draw a head: A consummate guide
How to draw a head
Cartoon a realistic head isn't easy, but this guide from Olivier Sin will assist yous to master the art. Read on...
15 tips for cartoon heads realistically
This workshop volition take you through all aspects of my cartoon method. I'll reveal my key limerick techniques, which range from establishing a point of view to applying cardinal illustration principles for creating an accurate and expressive likeness of the man head.
You'll also acquire how to apply what I consider to be the essentials of human facial anatomy, and explore how the concepts of value, shapes and plane changes affect a portrait's underlying structure. Elsewhere in this article I'll reveal my techniques for creating depth and dimension, and investigate how contrasting shapes are used to enhance depth in an illustration.
If your figure drawings are looking a little flat, so fright non – I'll also be covering how to create the illusion of iii dimensions when drawing on a flat surface. I'll examine how edges – contours besides as changes in value – are used to convey three- dimensional form. And information technology'south important to recall that non all portraits have to piece of work in isolation. In this article I'll also be demonstrating how expressive easily, facial hair and the correct choice of groundwork can all raise the finished piece, and make for a more pleasing viewing experience. So grab that charcoal stick and permit'due south first drawing!
01. Use line expressively

(Paradigm: © Oliver Sin)
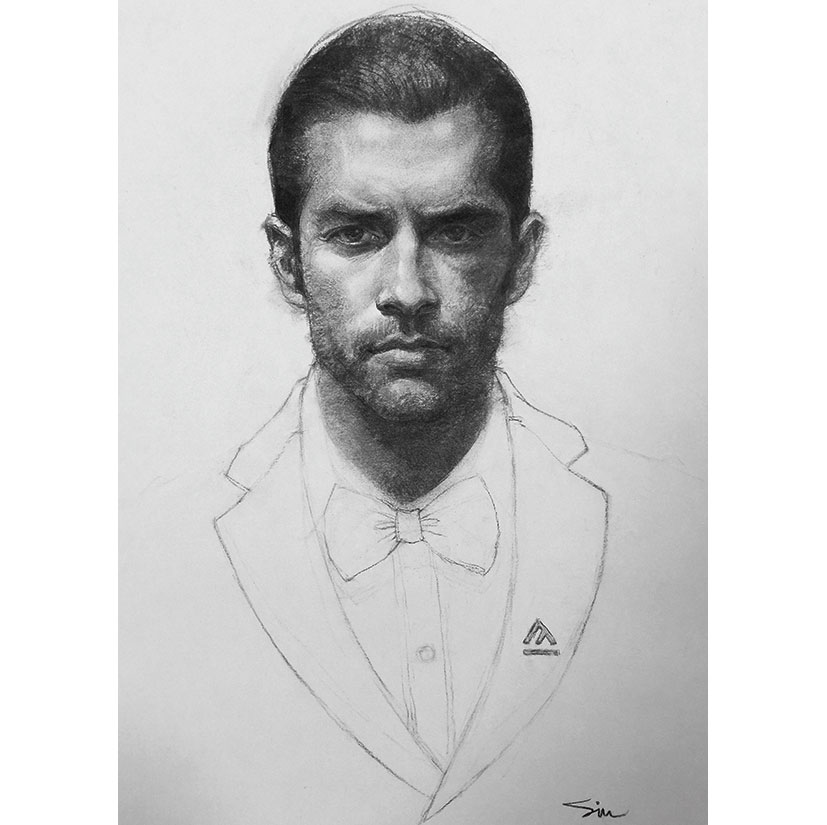
I drew these portraits with expressive lines by using simply the tip of the the vine charcoal, without blending with the flat side. I use lines depict the form of the head. It's been said that a line is a moving dot, or a point in motion. A line can guide a viewer's middle past defining edges and outlining shapes. Lines used to outline a shape are chosen contour or profile lines. The 5 types of lines are vertical lines, horizontal lines, diagonal lines, zig-zag lines and curved lines.
02. Consider your shapes

(Image: © Oliver Sin)
A shape is a closed contour, created when a line is enclosed, or when the ends of a line meet. All shapes are two-dimensional – they have both length and width. At that place are two types of shapes: geometric and organic. Geometric shapes include circles, triangles and squares. Organic shapes are those irregular, uneven shapes that seem to follow no rules; these expressive shapes are typically non man- made. I use mostly geometric shapes to depict a contour lines caput drawings.
03. Sympathize shapes
(Image: © Oliver Sin)
Form and shape are related. I think of forms as iii-dimensional shapes. In art, the term grade refers to an object that has length, width and top. I encourage you to develop your understanding of grade, and how to create the illusion of grade in head drawings, past studying the effect of light on objects. I prefer meridian lighting, which highlights the top-facing planes and casts farthermost shadows. Information technology'south all-time to use a single light source to light the head for portraiture.
04. Know the ability of values

(Image: © Oliver Sin)
Value refers to the lightness or darkness of a tone. Value is crucial in a drawing because light and dark values describe the form of an object. All objects have a highlight, light, mid- tone, cadre shadow and reflected light, and I frequently utilize this 5-value organisation to my portrait drawings. Value is the primal to the illusion of calorie-free, and a realistic cartoon depends on a range of values. When cartoon portraits, light and shadow translate from simple planes and shapes into detailed variations of value and line.
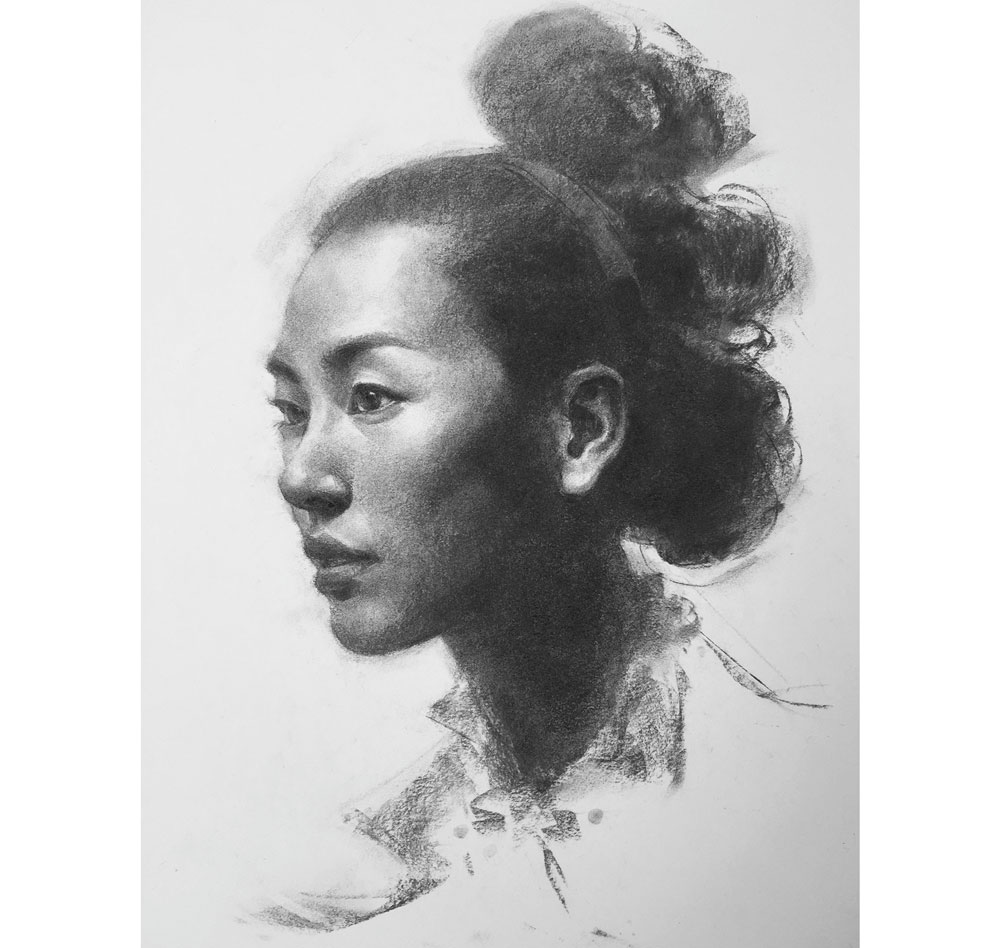
05. Utilize a five-value system to your portrait
(Image: © Oliver Sin)
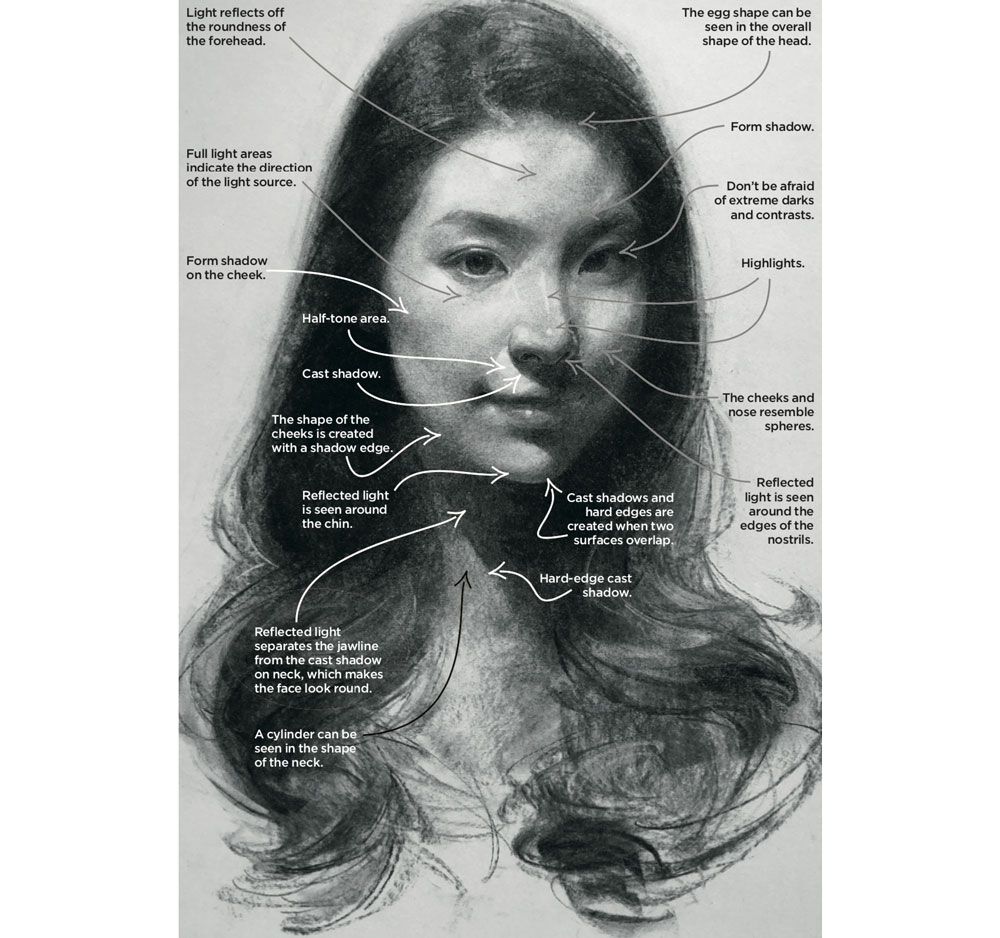
Geometric shapes tin be institute throughout the face up: an egg shape for the head; spheres in facial features such as the cheek and nose; and a cylinder for the neck. Calorie-free reflects off the roundness of the forehead.
Don't be afraid of extreme darks and contrasts. Reflected light can be seen around the edges of the nostrils. Cast shadows and hard edges are created when 2 surfaces overlap. In that location's a hard border on a bandage shadow of the neck in this instance. A form shadow is created on an object as its surface turns abroad from the calorie-free source, and it has soft edges. A cast shadow is created when light is blocked from an object. It has hard edges, with an abrupt alter from light to night.
06. Combine line and value
(Image: © Oliver Sin)
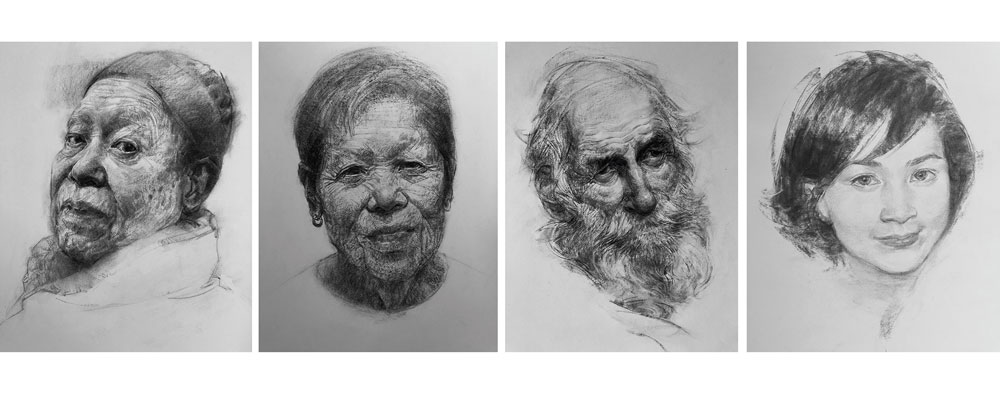
Line and value work together to create a likeness of the model. Value refers to the lightness or darkness of a colour or tone. Drawing areas of value lone ensures an artist becomes more aware of masses, forms and low-cal. Drawing lines encourages the artist to study, judge and plan before drawing. The knowledge gained from line-drawing helps the artist make decisions well-nigh the edges of each area of tone equally they develop the values. When drawing portraits, light and shadow translate from simple planes and shapes into detailed variations of value and line.
07. Apply value contrast
(Image: © Oliver Sin)
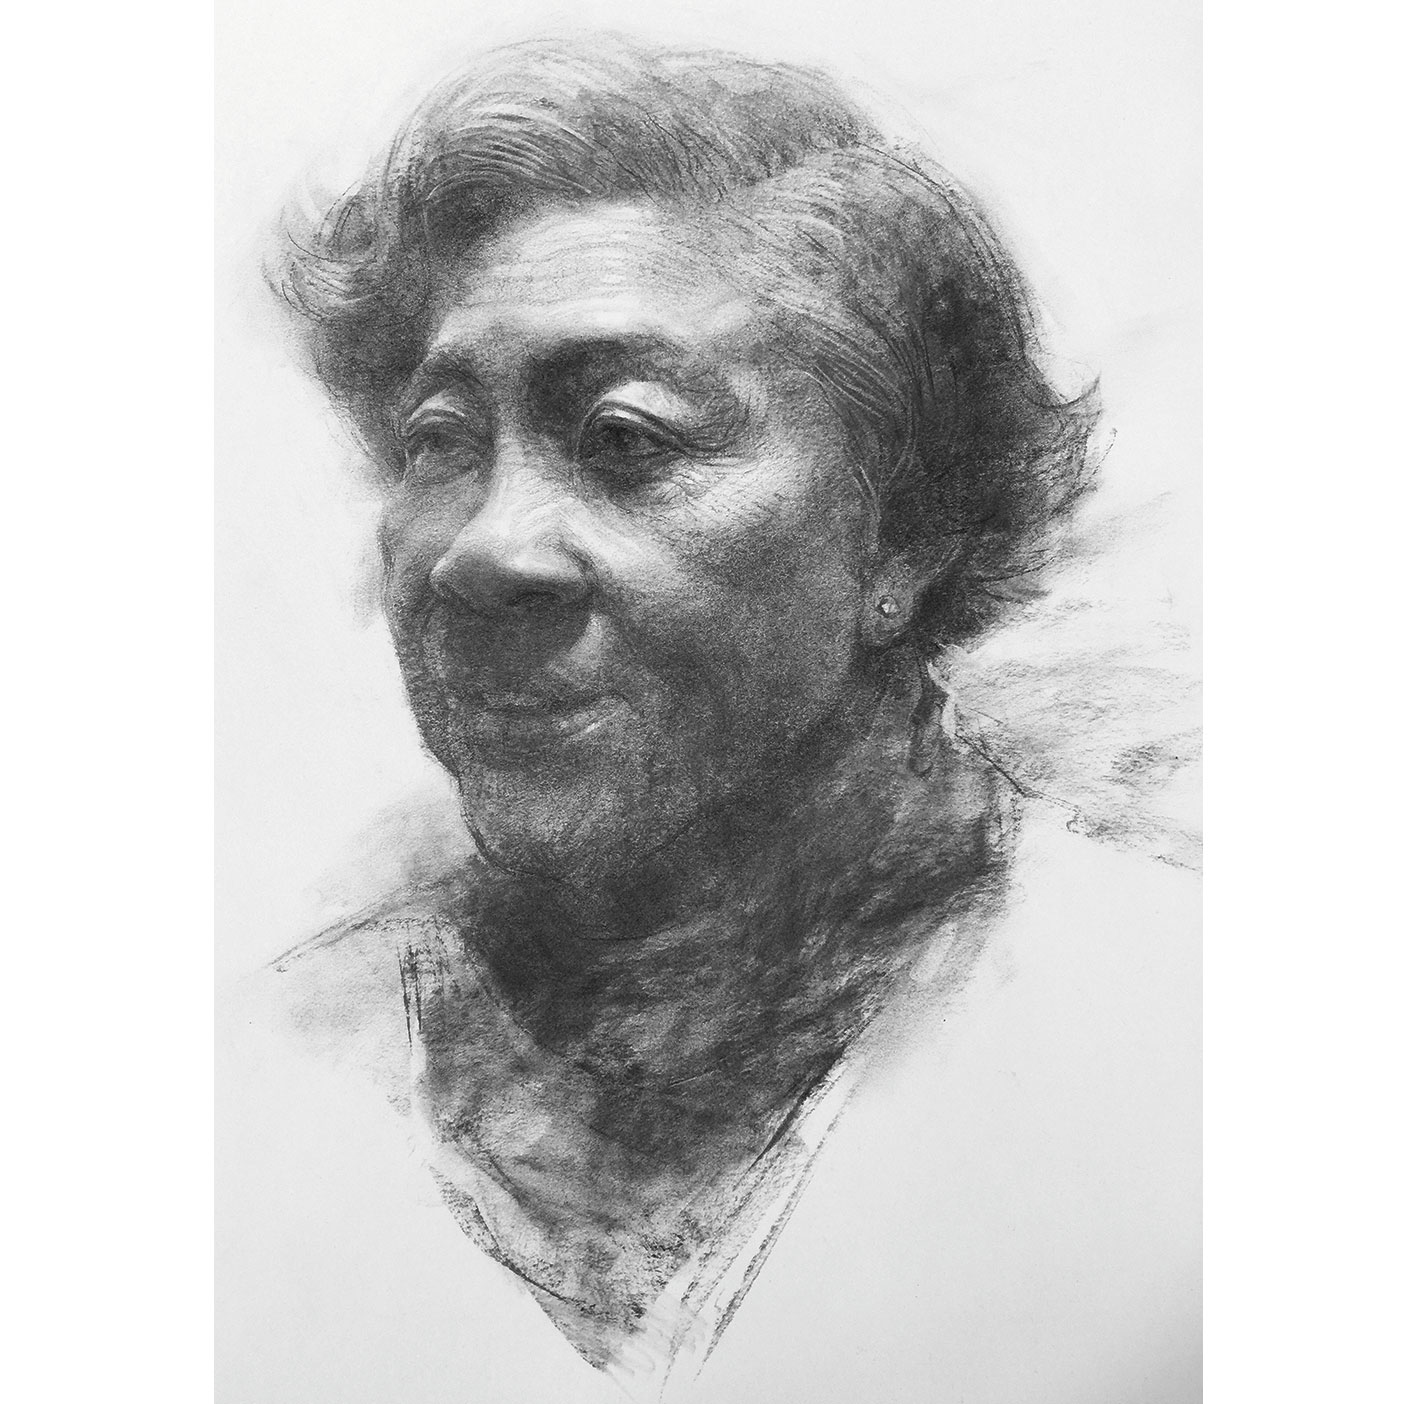
Value dissimilarity is the best way to create the illusion of depth. Areas with a lot of dissimilarity will come forward; areas with little contrast will recede. In this slice, equally the scarf wraps around the neck I pushed it dorsum visually past lowering the dissimilarity, using similar values within information technology and drawing a thin line to suggest an edge. It becomes less visible as it recedes, instead of outlining its shape which would requite it its own separate value.
I applied the aforementioned approach at the crown of the head by gradually lightening the value of the pilus and so it recedes into the background. Reducing value contrast at the perimeters of the face draws the eye to its center, where I used high contrast between the left heart socket and the brow.
08. Use foreshortening when in iii-quarter view
(Prototype: © Oliver Sin)
When the head is viewed at three-quarter bending, the perspective of the facial features are skewed. Foreshortening causes the closest parts of an object to appear larger than those farther abroad. Study proportion variation and measure out the distance betwixt features. Three-quarter
view places the accent on the closest heart as the focal signal. The eyes and eyebrows reveal the mood of your field of study – they can prove emotion and personality. The well-nigh side of the face up is wider than the far side considering of foreshortened perspective. The cheekbone is more divers on the far side of the face, with a harder contour line.
Want to know more than about foreshortening? Run across our guide to foreshortening in fine art.
09. Consider the divergence between head drawing vs portrait drawing

(Paradigm: © Oliver Sin)
There'due south a departure between head drawing and portrait cartoon. Head drawing focuses on shapes, plane changes, beefcake, class and the perspective of the head. Portrait drawing is an artist's representation of a person's spirit: their expression, likeness, personality and mood. The "class" of the head refers only to the external advent of the face.
To describe spirited portraits, y'all must consider what message – or perception – a portrait will communicate. The artist's personal perception is the common denominator of every piece of work of art he or she creates. Each artwork reflects the unique perspective of the artist, no matter the style or subject. I would say that a good drawing features something that comes from within the artist.
10. Recognise the issue of contrapposto on the caput and neck

(Image: © Oliver Sin)
The position of the head and the neck constitute the attitude of the portrait and hints at the emotion of the model. Besides the bending of the head, look for the stretch and compression in the neck that reinforces the gesture. The word contrapposto describes the twisting action of the torso. When a effigy twists the torso, does the cervix.
Train your listen to recognise contrapposto and its outcome on the neck. I often enquire models to thrust the head forwards and upward, and the stretch of the model'due south neck expresses a haughty gracefulness. Ane of my favourite poses has the model, with a dreamy look in their eyes, looking at the viewer over their shoulder.
11. How to draw an expressive portrait
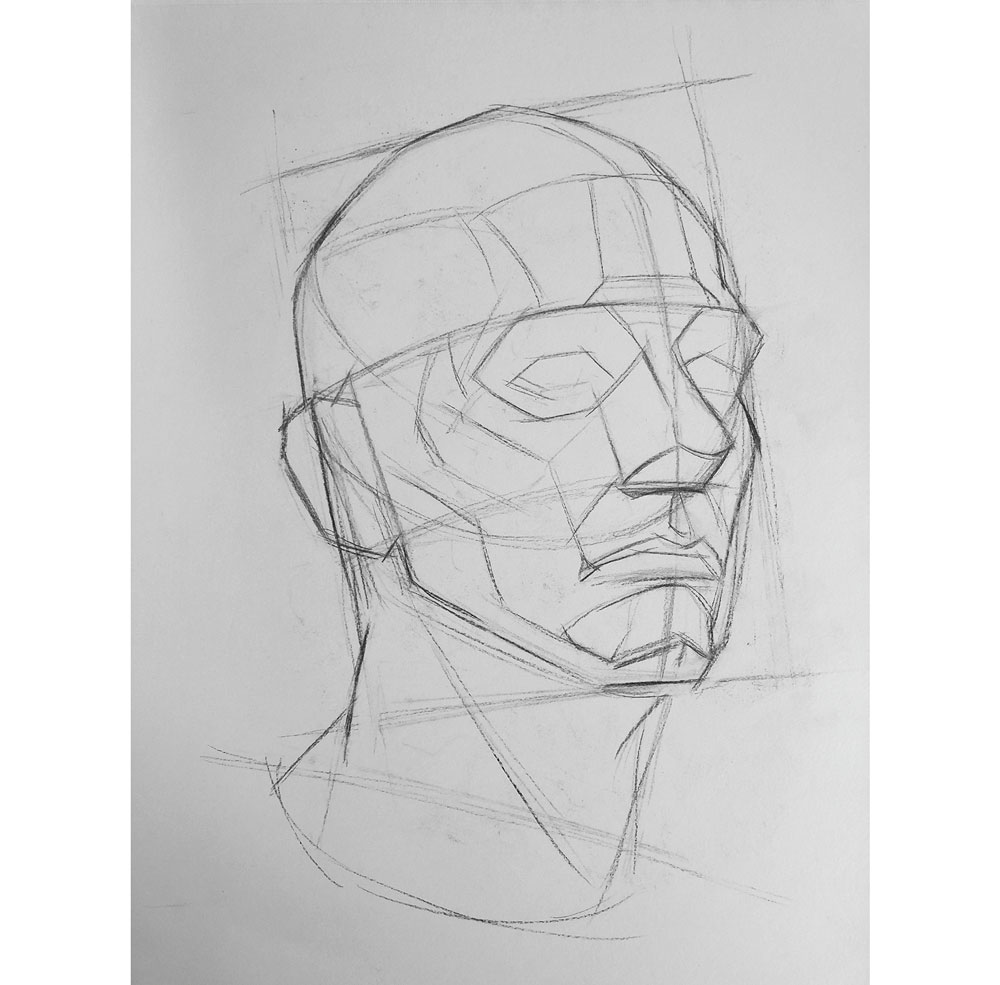
a). Draw the shapes
(Image: © Oliver Sin)
Use vine charcoal to map the position of the caput by mark the acme, bottom and side boundaries with straight lines. Direct lines enable you to discover the bailiwick as a whole and examine the relationships between central blocks so you lot can define them accurately on paper.
Draw a brawl shape for the skull and a U-shape for the jaw. Plant the cross where the middle line of the face crosses the countenance line. Identify and divide the head into thirds: one- tertiary from the hairline to the eyebrows, ane-third from the eyebrows to the olfactory organ, and one- third from the olfactory organ to the chin. The lower lip is halfway between the nose and the mentum. Avert specific details – merely map out the head's general proportions.
Continue to utilize straight lines to ascertain the large shadow areas, such as the eye sockets. I'd draw the heart sockets shapes first, and then the base of the nose shape before the rima oris shapes. Define the gauge shapes of the head's outline and mark the countenance. Find the shape of the chin's lesser plane, which is foreshortened because of the angle of the head.
b). Define planes

(Epitome: © Oliver Sin)
Continue to ascertain the shape of the ear, which aligns with the forehead line and the bottom of the nose. Define the planes of the forehead, cheekbones, nose and mentum with straight lines. Study the proportions and relationships of the shapes to one another. Avoid adding details such every bit the pupils and nostrils for now.
Employ lines to define areas of shadow and where planes run across, such as the front end, sides and gradient of the brow, and the front, wings and base of the nose. Marker the shapes and positions of the forehead arch, cheekbones, temporal basic, chin and jaw. Treat this drawing as a pattern. Apply the broad side of the vine charcoal to brainstorm blocking in values to build the structure of the head. Call up that all objects take light, middle, and dark values when exposed to light. Hatch the shadow areas of the head, such equally the eye sockets, and continue into the nighttime shadow of the cheekbone and other shadow areas. Train your eyes to unify the shadow areas, while avert seeing individual facial details. You could reduce the textures by blending the surface with your fingertips or a stump.
c). Start detailing

(Epitome: © Oliver Sin)
In each area where yous work on details, reexamine the shapes of the different parts, paying attention to the strokes and then that in that location's variation in hard and soft edges. Wherever you add particular, shade the entire expanse starting time, then pull out highlights with an eraser and and then use a charcoal pencil to emphasise the shadows.
Wrinkles can enrich the drawing with texture and details. Wrinkles shouldn't stand out and must correspond to the shapes of the facial features. Focus on conveying an impression of wrinkles, rather than drawing all of them.
Cease past reexamining the light, mid-tone and night values, as well as the edges of the face. Each of the three major values should be further rendered into iii more than values, together with the highlight, for a wide value range that captures the forms. The edges of the face shouldn't form one continuous line, but instead comprise rhythm, spatial relationships and variation.
Reinforce the boundary betwixt light and dark on the chin to solidify this facial feature and softly represent the structure and texture. Finally, reinforce the dark areas even more past calculation willow charcoal with vine charcoal.
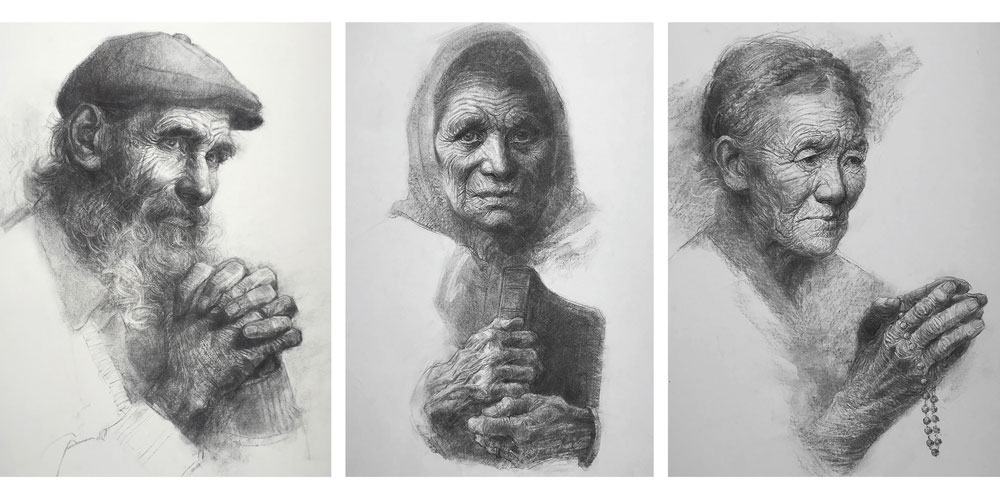
12. Express mood with the hands
(Image: © Oliver Sin)
Hands add emotion and feeling to a drawing. Including the hands can turn a regular portrait into a grapheme study: a candid, unposed approach that reveals the subject's personality. On a philosophical level, hands represent the fashion nosotros touch and feel objects, or fifty-fifty other people – how we 'connect' with the outside earth.
13. Consider a texture background
(Epitome: © Oliver Sin)
The texture groundwork tin play a fundamental role in the visual statement of a drawing. A background can give an artwork a soft, calm wait, or liven a piece with an energetic hit approach. Incorporating a creative background in your art shouldn't accept the focus abroad from the subject.
Concentrate on the lights and darks of the subject when selecting a background treatment. If the subject is light on 1 side, a nighttime tone behind will show the contours more clearly. Use the background to testify off the contrast and enhance your work, not compete with it. There's no formula for achieving the correct background, so be creative!
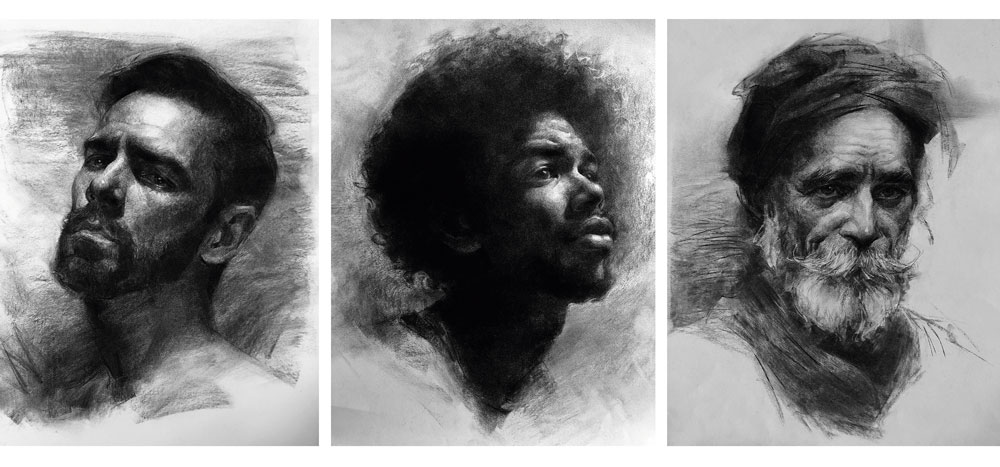
xiv. Create facial hair
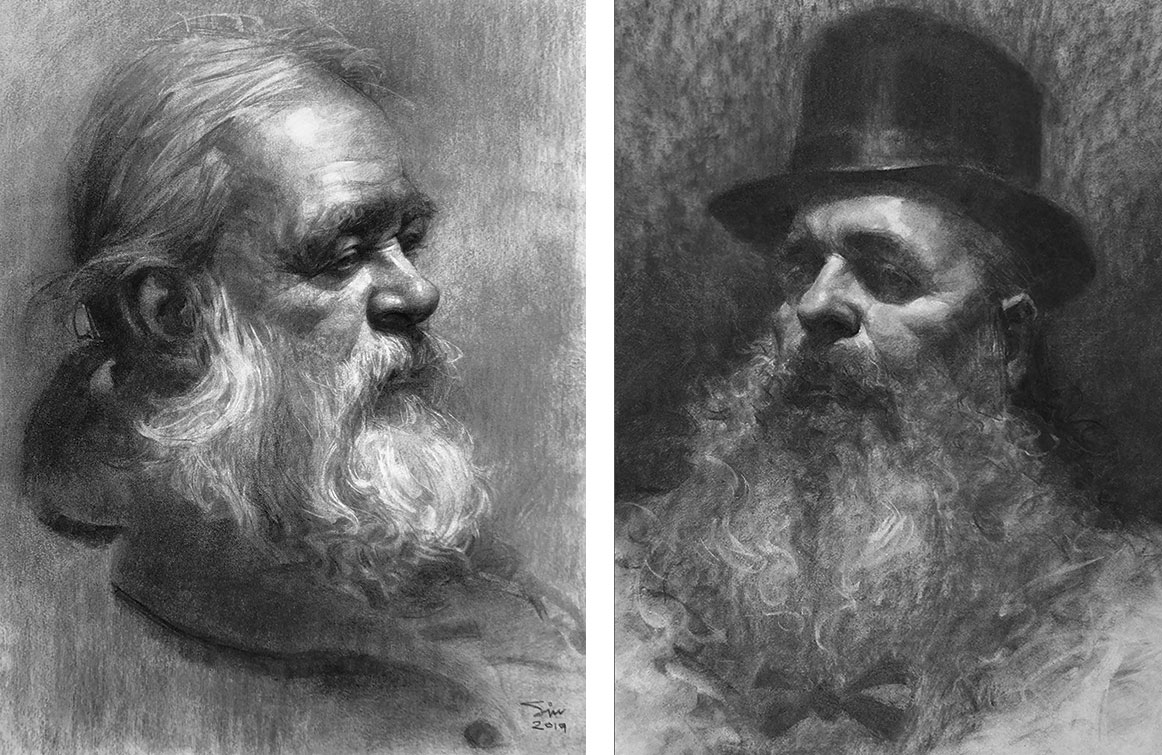
(Image: © Oliver Sin)
Every moustache or beard is different, but there are several central things to look for. The nose casts a shadow on the moustache, and the moustache casts a shadow on the rima oris. If the moustache is very full, it may comprehend the upper lip. Think of the moustache every bit a large upper lip that wraps around the mouth, producing larger shadows. Follow the light and shadow on the head if the planes aren't visible in the facial hair.
Pay attention to the beard'south shape, and train your centre to run into that hair has no definable edge, like smoke. Rather than drawing individual hairs, treat the bristles as a mass of low-cal and shadow, keeping the edges soft.
15. Employ edges to convey form
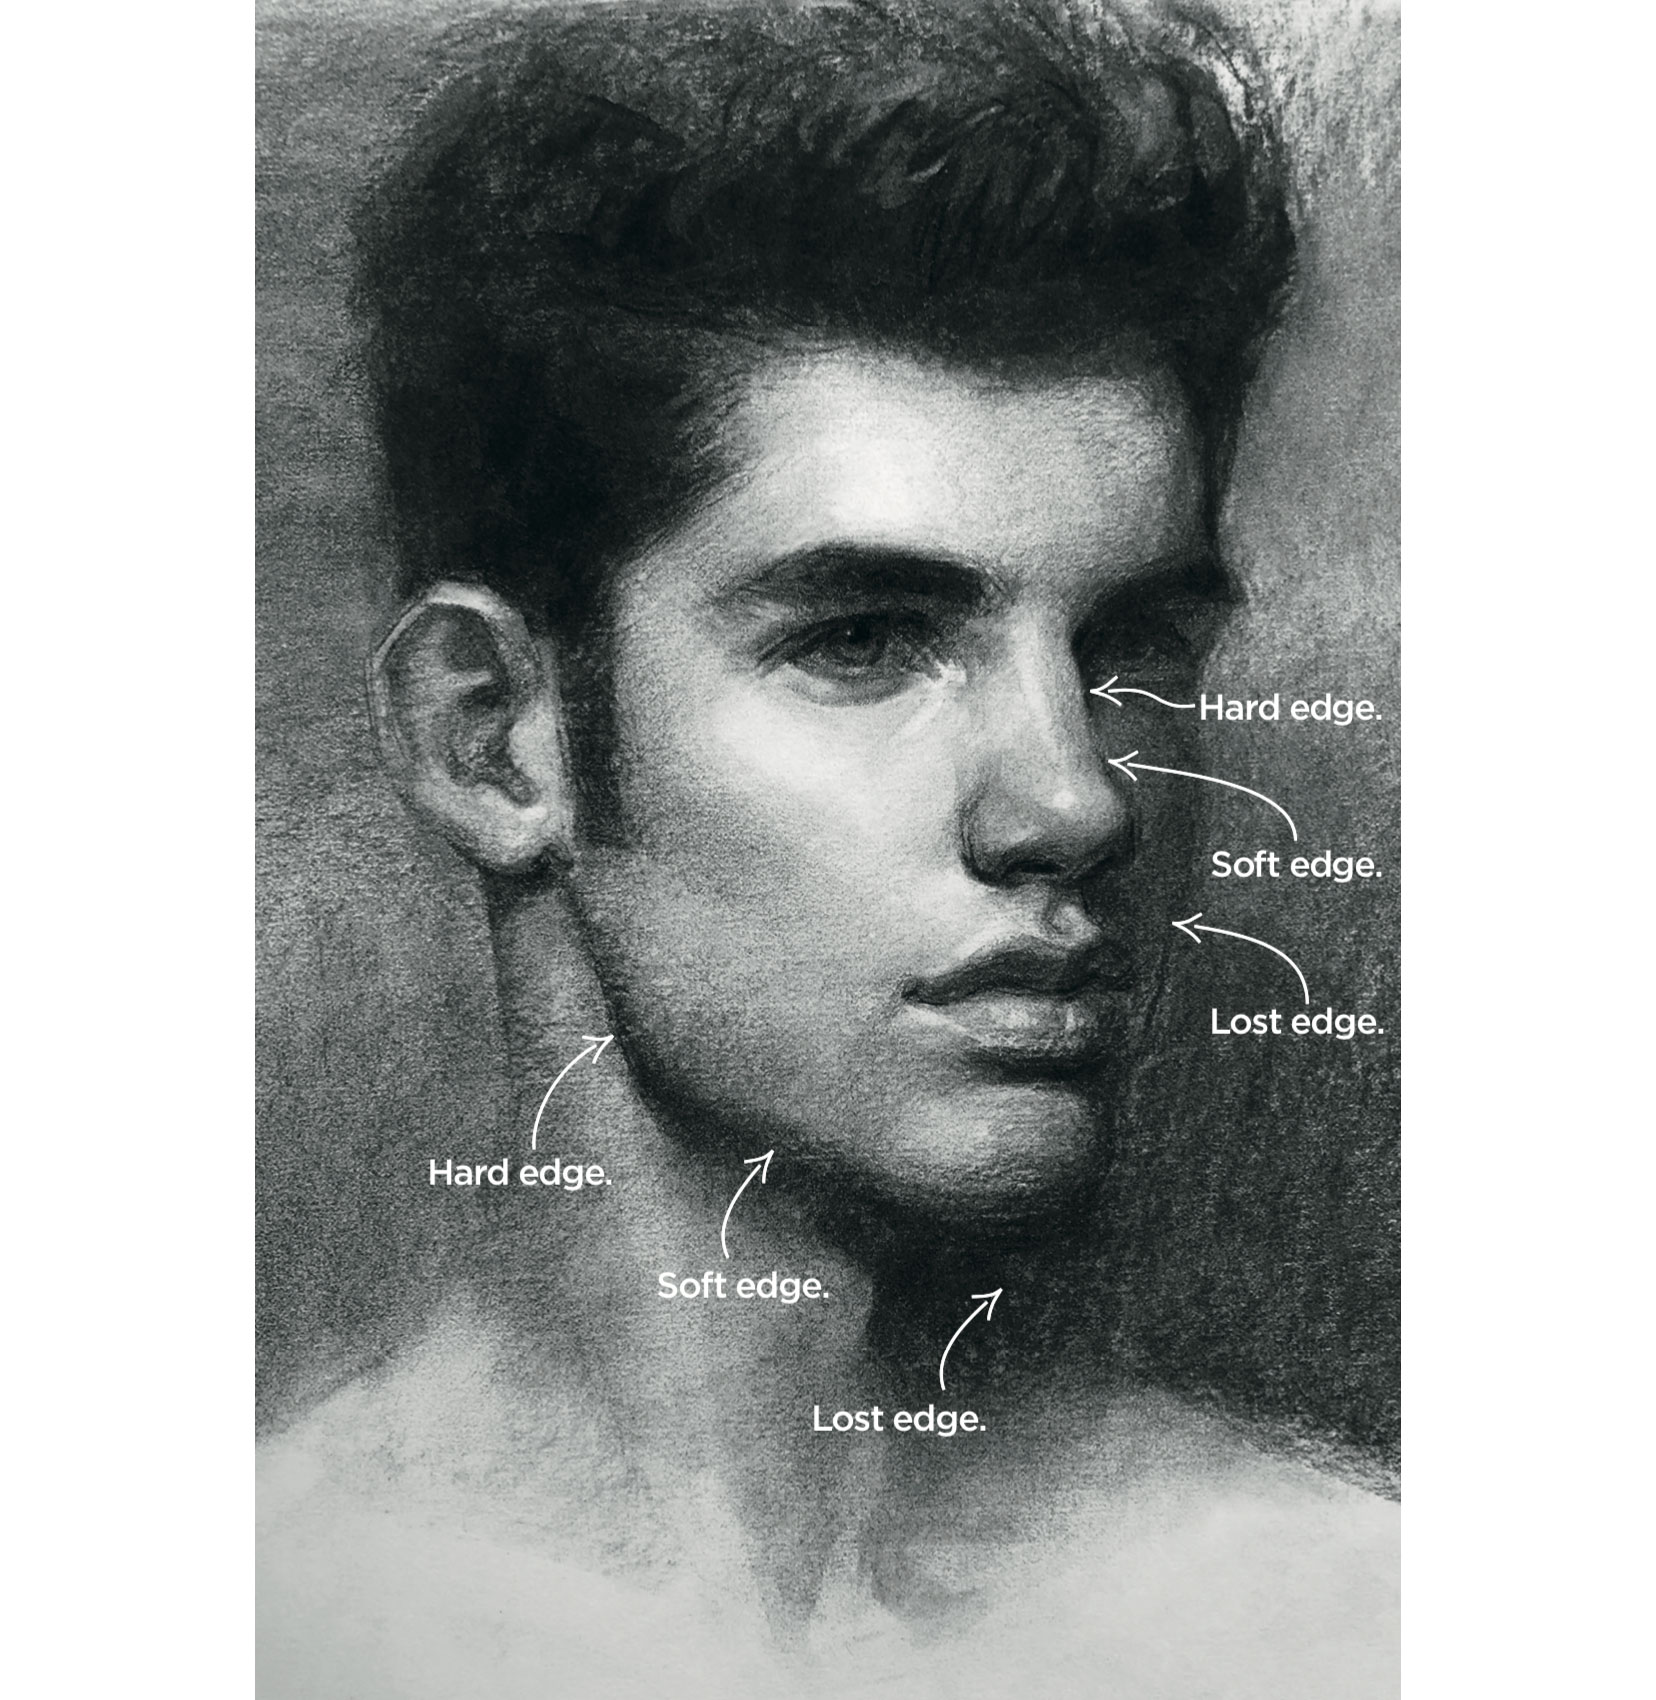
(Epitome: © Oliver Sin)
When an creative person mixes soft and hard lines, or edges, in the correct places, information technology sets up a path for the viewer's eyes, creating the illusion of three dimensions on a two-dimensional surface. When edges are soft, an chemical element tin seem to recede.
You can further blend a subject into the background by making its lines soft. A soft- edged drawing creates a fuzzy, dreamy effect, whereas a drawing with too many hard edges volition wait unnatural, creating visual tension because too many areas are competing. This will confuse viewers because there's nowhere for their eyes to rest. I don't mean you lot should never utilise hard edges, but you should use them sparingly for emphasis, keeping lines hard at your focal point.
In my portrait drawings, I generally employ a proportion of roughly 85 per cent soft lines and 15 per cent difficult lines. If you understand and primary the power of controlling edges in your drawings, you lot'll be amazed at how much your portraits will amend.
The second page of content was originally published in issue 183 of ImagineFX , the world'southward best-selling mag for digital artists. Buy upshot 183 or subscribe to ImagineFX .
Read more:
- Describe on the power of contrast in art
- The best art easels in 2022
- Art terms: The ultimate artist's glossary
Related articles

Source: https://www.creativebloq.com/how-to/how-to-draw-a-head-from-different-angles/2
Posted by: coxduccies.blogspot.com
0 Response to "How To Draw A Buffalo Head"
Post a Comment